Hello Coder


  • 首页

  • 归档

  • 标签

  • 搜索
close

HashSet

发表于 2016-08-16

OpenJDK 源代码阅读之 HashSet


概要

  • 类继承关系
1
2
3
4
java.lang.Object
java.util.AbstractCollection<E>
java.util.AbstractSet<E>
java.util.HashSet<E>
  • 定义
1
2
3
public class HashSet<E>
extends AbstractSet<E>
implements Set<E>, Cloneable, Serializable
  • 要点
  1. 不保证元素次序,甚至不保证次序不随时间变化
  2. 基本操作(add, remove, contains, size)常量时间
  3. 迭代操作与当前元素个数加底层容量大小成正比
  4. 不保证同步

思考

  • 总体实现

底层是用 HashMap 实现的,Set 中的数据是 HashMap 的 key,所有的 key 指向同一个 value, 此 value 定义为:

1
2
// Dummy value to associate with an Object in the backing Map
private static final Object PRESENT = new Object();

再看一下 add,大概就能明白了

1
2
3
4
5
6
7
8
9
10
11
12
13
14
15
/**
* Adds the specified element to this set if it is not already present.
* More formally, adds the specified element <tt>e</tt> to this set if
* this set contains no element <tt>e2</tt> such that
* <tt>(e==null&nbsp;?&nbsp;e2==null&nbsp;:&nbsp;e.equals(e2))</tt>.
* If this set already contains the element, the call leaves the set
* unchanged and returns <tt>false</tt>.
*
* @param e element to be added to this set
* @return <tt>true</tt> if this set did not already contain the specified
* element
*/
public boolean add(E e) {
return map.put(e, PRESENT)==null;
}
  • load factor
1
2
3
4
public HashSet(Collection<? extends E> c) {
map = new HashMap<>(Math.max((int) (c.size()/.75f) + 1, 16));
addAll(c);
}

初始化中,注意使用的 HashMap 的 load factor 设置为 0.75,如果太小,就设置成 16.

HashSet 并没有什么特别之处,几乎没有自己特有的实现,都是调用 HashMap 的方法实现相应的功能。
Spring MVC ApplicationContext

发表于 2016-08-16

概述

以只有1个Servlet的简单情况为例,一般涉及到3个配置文件:web.xml,applicationContext.xml,xxx-servlet.xml。

web.xml

1
2
3
4
5
6
7
8
9
10
11
12
13
14
15
16
<context-param>
<param-name>contextConfigLocation</param-name>
<param-value>classpath:/applicationContext.xml</param-value>
</context-param>
<listener>
<listener-class>org.springframework.web.context.ContextLoaderListener</listener-class>
</listener>
<servlet>
<servlet-name>xxx</servlet-name>
<servlet-class>org.springframework.web.servlet.DispatcherServlet</servlet-class>
<load-on-startup>1</load-on-startup>
</servlet>
<servlet-mapping>
<servlet-name>xxx</servlet-name>
<url-pattern>*.html</url-pattern>
</servlet-mapping>

在这种情况下,系统会生成2个ApplicationContext,确切的说是2个WebApplicationContext.

ROOT ApplicationContext

在Tomcat启动时,通过注册的监听器ContextLoaderListener,Spring初始化WebApplicationContext并保存到ServletContext中,初始化使用的配置文件位置由contextConfigLocation参数确定。该Context为整个框架中的ROOT Context,其他的Context都会作为其子节点或子孙节点进行关联。

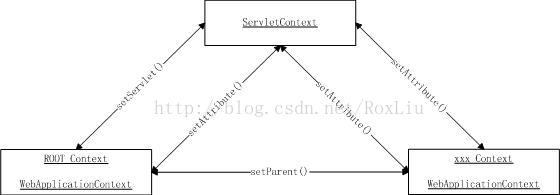
WebApplicationContext和ServletContext互相保存对方的引用:

1
2
//保存到ServletContext中
servletContext.setAttribute(WebApplicationContext.ROOT_WEB_APPLICATION_CONTEXT_ATTRIBUTE,this.context);
1
2
//保存ServletContext
wac.setServletContext(sc);

xxx ApplicationContext

Tomcat生成xxx Servlet时,DispatcherServlet会使用xxx-servlet.xml(除非显示指定其他文件)初始化WebApplicationContext,将其父节点设为ROOT Context,并保存到ServletContext中。

在createWebApplicationContext()方法中,设置父节点:

1
wac.setParent(parent);

在configureAndRefreshWebApplicationContext()方法中保存ServletContext:

1
2
wac.setServletContext(getServletContext());
wac.setServletConfig(getServletConfig());

在initWebApplicationContext()方法中将自己保存到ServletContext中:

1
2
3
// Publish the context as a servlet context attribute.
String attrName = getServletContextAttributeName();
getServletContext().setAttribute(attrName, wac);

ServletContext、ROOT Context和xxx Context三者引用之间的关系如下:

获取的方法:

  • ServletContext:

无论是在ROOT还是xxx Context中,可以通过:

1
WebApplicationContext. getServletContext();
  • ROOT Context:

该Context是” org.springframework.web.context. WebApplicationContext. ROOT”为Key保存在ServletContext中。可以使用Spring提供的工具类方法获取:

1
WebApplicationContextUtils.getWebApplicationContext(ServletContextsc)

在xxx Context中可以通过getParent得到ROOT Context。

  • xxx Context:

该Context是以” org.springframework.web.servlet.FrameworkServlet.CONTEXT.xxx”为KEY(xxx为web.xml中定义的Servlet名称),保存在ServletContext中。可以使用Spring提供的工具类方法获取:

1
WebApplicationContextUtils.getWebApplicationContext(ServletContextsc, String attrName)

DispatchServlet 初始化

发表于 2016-08-15

设计模型

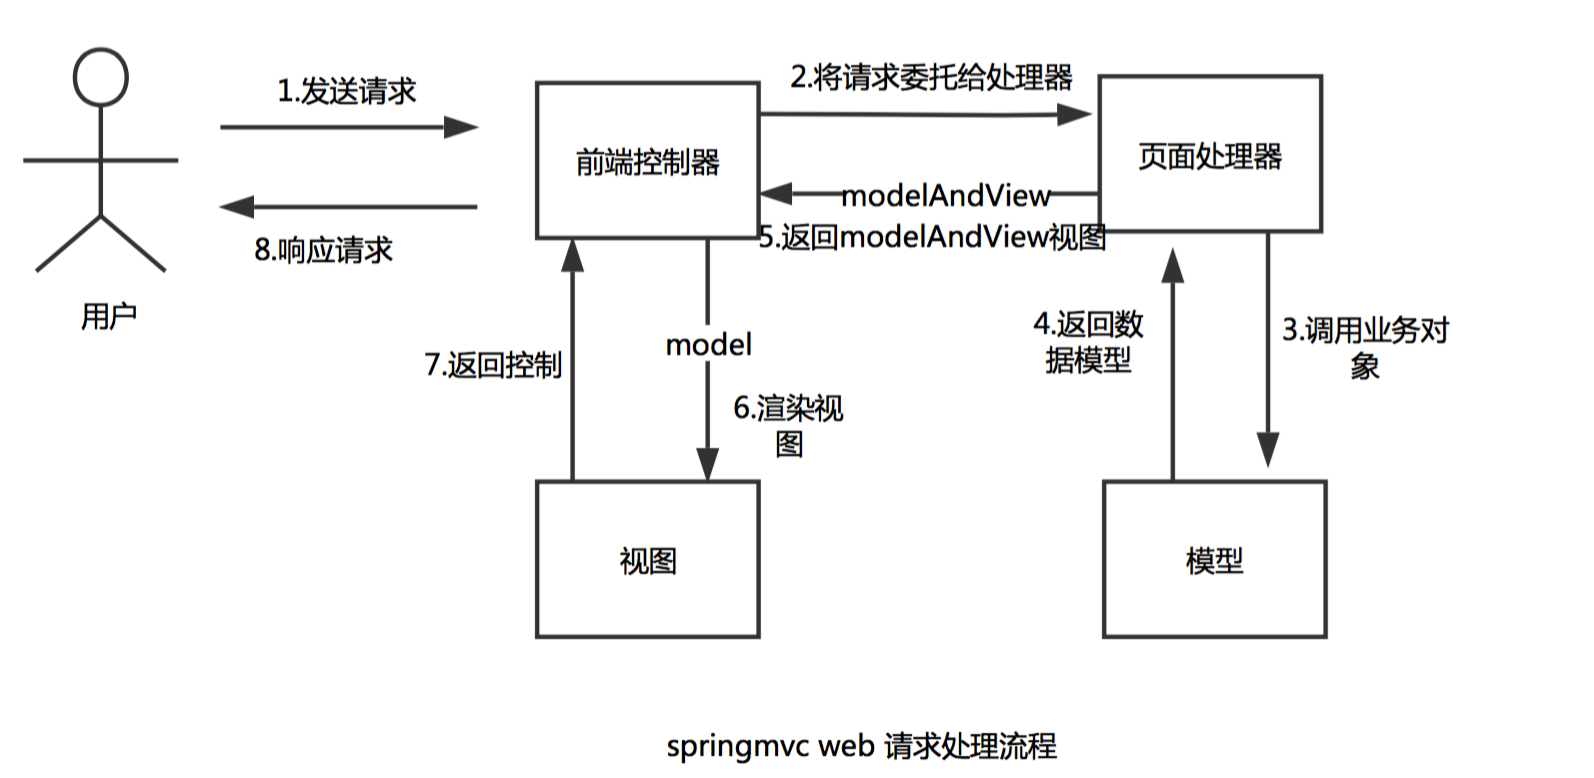
  • Spring MVC 请求处理流程

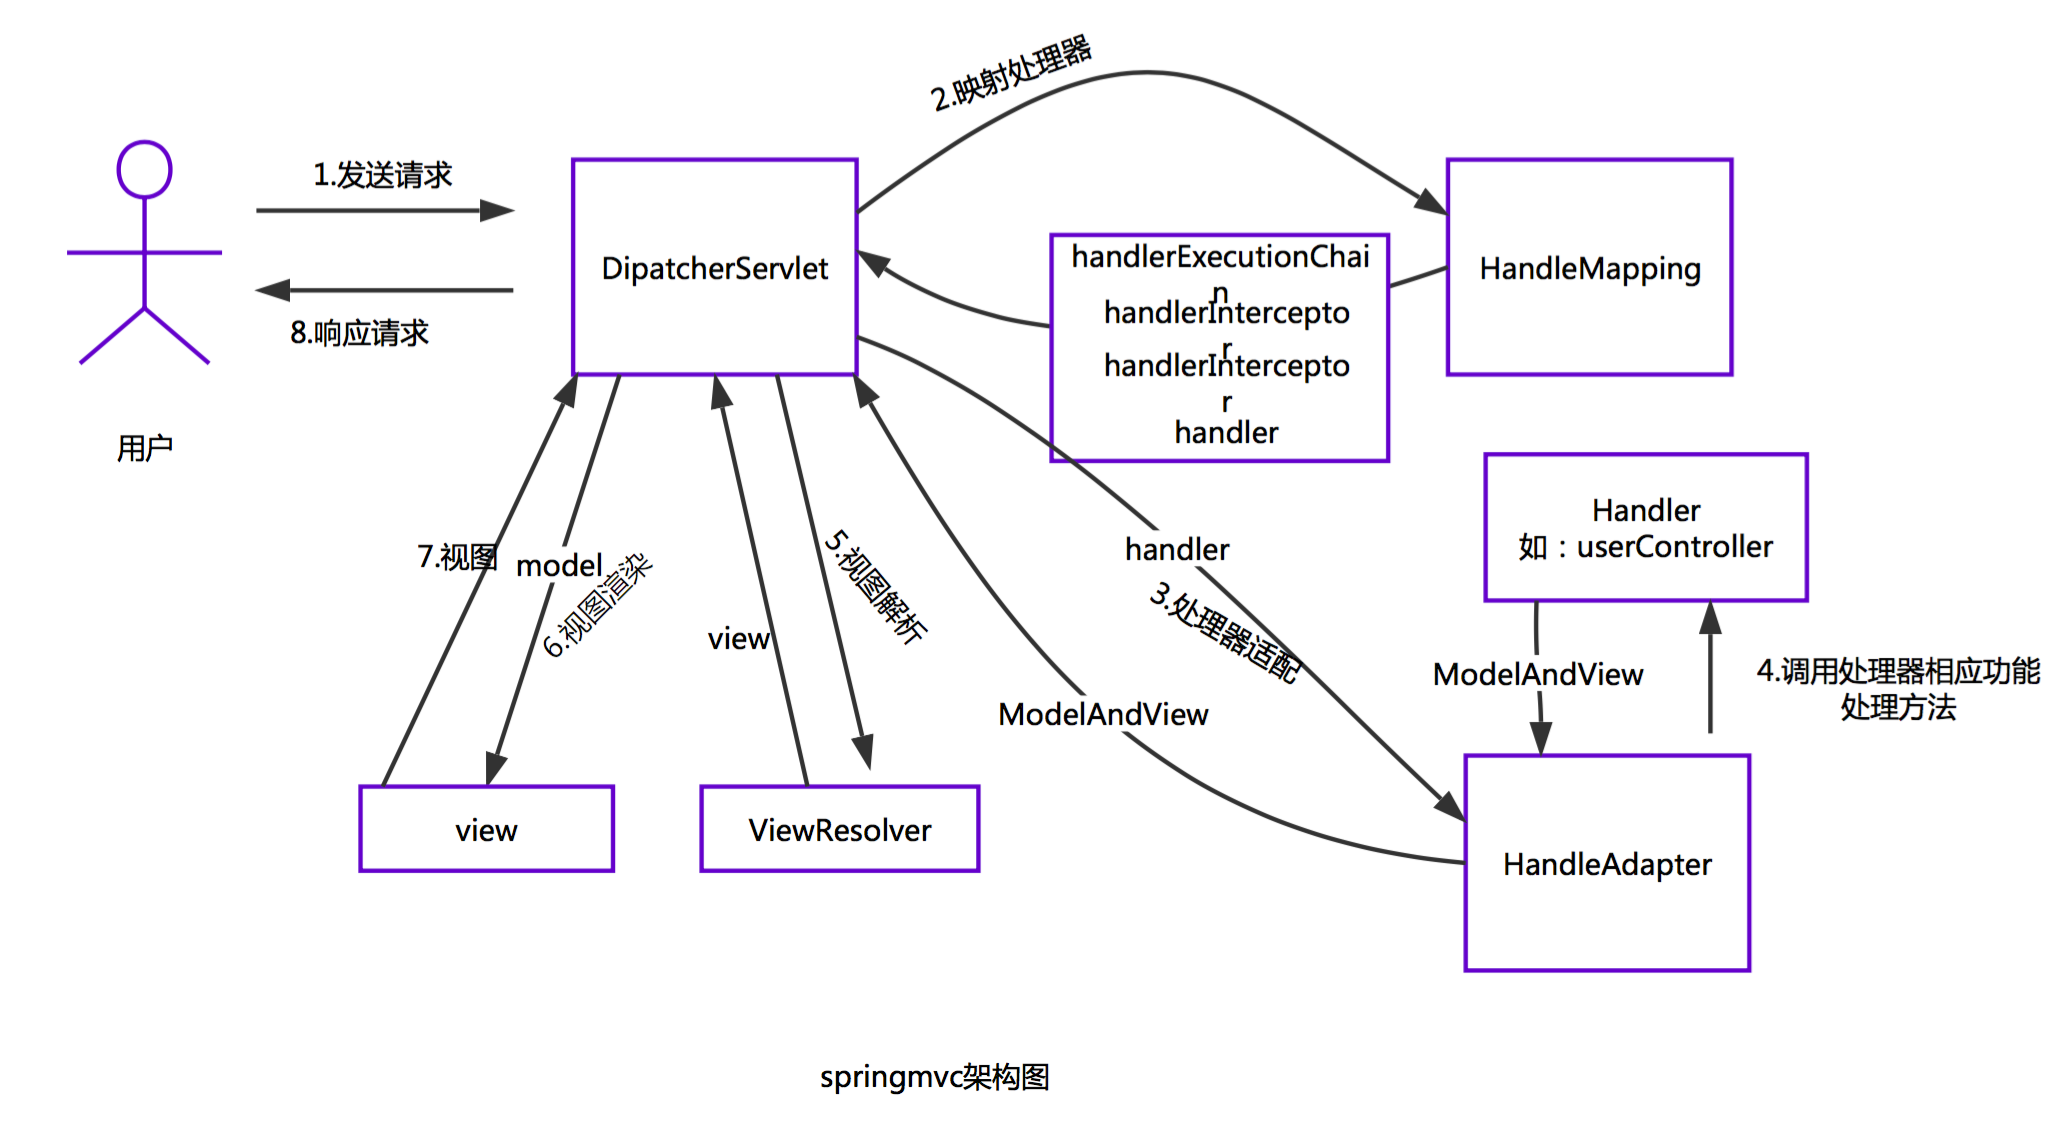
  • Spring MVC 架构图

代码简要

  • Servlet:

所有的Servlet都是实现了Servlet接口,该接口提供了servlet生命周期的一些方法,如: init(), destroy(),service()<每次接收到请求都由该方法来处理>等,没有具体实现。

1
public void init(ServletConfig config) throws ServletException;
  • GenericServlet:
    该类实现了Servlet的init()方法以及提供了获取初始化参数的方法。init方法的实现最后需要由子类实现

获取初始化参数:

1
2
3
4
5
6
7
ServletConfig sc = getServletConfig();
if (sc == null) {
throw new IllegalStateException(
lStrings.getString("err.servlet_config_not_initialized"));
}
return sc.getInitParameter(name);

init()初始化:

1
2
3
4
public void init(ServletConfig config) throws ServletException {
this.config = config;
this.init();//调用下面的init()方法(没有具体实现)
}
1
2
3
public void init() throws ServletException {
}
  • HttpServlet
    实现了servlet的service()方法,所有的请求都由该方法来处理,判断走doGet()还是doPost()等等。
    该方法是有Tomcat容器来调用的(init()方法也是)。
1
2
3
4
5
6
7
8
9
10
11
12
13
14
15
16
public void service(ServletRequest req, ServletResponse res)
throws ServletException, IOException
{
HttpServletRequest request;
HttpServletResponse response;
if (!(req instanceof HttpServletRequest &&
res instanceof HttpServletResponse)) {
throw new ServletException("non-HTTP request or response");
}
request = (HttpServletRequest) req;
response = (HttpServletResponse) res;
service(request, response);
}
1
2
3
4
5
6
7
8
9
10
11
12
13
14
15
16
17
18
19
20
21
22
23
24
25
26
27
28
29
30
31
32
33
34
35
36
37
38
39
40
41
42
43
44
45
46
47
48
49
50
51
52
53
54
55
56
57
58
protected void service(HttpServletRequest req, HttpServletResponse resp)
throws ServletException, IOException
{
String method = req.getMethod();
if (method.equals(METHOD_GET)) {
long lastModified = getLastModified(req);
if (lastModified == -1) {
// servlet doesn't support if-modified-since, no reason
// to go through further expensive logic
doGet(req, resp);
} else {
long ifModifiedSince = req.getDateHeader(HEADER_IFMODSINCE);
if (ifModifiedSince < lastModified) {
// If the servlet mod time is later, call doGet()
// Round down to the nearest second for a proper compare
// A ifModifiedSince of -1 will always be less
maybeSetLastModified(resp, lastModified);
doGet(req, resp);
} else {
resp.setStatus(HttpServletResponse.SC_NOT_MODIFIED);
}
}
} else if (method.equals(METHOD_HEAD)) {
long lastModified = getLastModified(req);
maybeSetLastModified(resp, lastModified);
doHead(req, resp);
} else if (method.equals(METHOD_POST)) {
doPost(req, resp);
} else if (method.equals(METHOD_PUT)) {
doPut(req, resp);
} else if (method.equals(METHOD_DELETE)) {
doDelete(req, resp);
} else if (method.equals(METHOD_OPTIONS)) {
doOptions(req,resp);
} else if (method.equals(METHOD_TRACE)) {
doTrace(req,resp);
} else {
//
// Note that this means NO servlet supports whatever
// method was requested, anywhere on this server.
//
String errMsg = lStrings.getString("http.method_not_implemented");
Object[] errArgs = new Object[1];
errArgs[0] = method;
errMsg = MessageFormat.format(errMsg, errArgs);
resp.sendError(HttpServletResponse.SC_NOT_IMPLEMENTED, errMsg);
}
}

以上几个类都是不需要Spring框架的参与。

阅读全文 »

servlet 生命周期

发表于 2016-08-15

Servlet生命周期与工作原理

Servlet生命周期分为三个阶段:

  1. 初始化阶段 : 调用init()方法

  2. 响应客户请求阶段 : 调用service()方法

  3. 终止阶段 : 调用destroy()方法   

Servlet初始化阶段:

在下列时刻Servlet容器装载Servlet:

  • Servlet容器启动时自动装载某些Servlet,实现它只需要在web.XML文件中的之间添加如下代码:
1
<loadon-startup>1</loadon-startup>
  • 在Servlet容器启动后,客户首次向Servlet发送请求
  • Servlet类文件被更新后,重新装载Servlet

Servlet被装载后,Servlet容器创建一个Servlet实例并且调用Servlet的init()方法进行初始化。在Servlet的整个生命周期内,init()方法只被调用一次。

Servlet工作原理:

首先简单解释一下Servlet接收和响应客户请求的过程,首先客户发送一个请求,Servlet是调用service()方法对请求进行响应的,通过源代码可见,service()方法中对请求的方式进行了匹配,选择调用doGet,doPost等这些方法,然后再进入对应的方法中调用逻辑层的方法,实现对客户的响应。在Servlet接口和GenericServlet中是没有doGet,doPost等等这些方法的,HttpServlet中定义了这些方法,但是都是返回error信息,所以,我们每次定义一个Servlet的时候,都必须实现doGet或doPost等这些方法。

每一个自定义的Servlet都必须实现Servlet的接口,Servlet接口中定义了五个方法,其中比较重要的三个方法涉及到Servlet的生命周期,分别是上文提到的init(),service(),destroy()方法。GenericServlet是一个通用的,不特定于任何协议的Servlet,它实现了Servlet接口。而HttpServlet继承于GenericServlet,因此HttpServlet也实现了Servlet接口。所以我们定义Servlet的时候只需要继承HttpServlet即可。

  Servlet接口和GenericServlet是不特定于任何协议的,而HttpServlet是特定于HTTP协议的类,所以HttpServlet中实现了service()方法,并将请求ServletRequest,ServletResponse强转为HttpRequest和HttpResponse。

1
2
3
4
5
6
7
8
9
10
11
12
13
14
15
16
public void service(ServletRequest req,ServletResponse res)
throws ServletException,IOException
{
HttpRequest request;
HttpResponse response;
try
{
req = (HttpRequest)request;
res = (HttpResponse)response;
}catch(ClassCastException e)
{
throw new ServletException("non-HTTP request response");
}
service(request,response);
}

代码的最后调用了HTTPServlet自己的service(request,response)方法,然后根据请求去调用对应的doXXX方法,因为HttpServlet中的doXXX方法都是返回错误信息

1
2
3
4
5
6
7
8
9
10
11
12
13
14
protected void doGet(HttpServletRequest res,HttpServletResponse resp)
throws ServletException,IOException
{
String protocol = req.getProtocol();
String msg = IStrings.getString("http.method_get_not_supported");
if(protocol.equals("1.1"))
{
resp.sendError(HttpServletResponse.SC.METHOD.NOT.ALLOWED,msg);
}
esle
{
resp.sendError(HttpServletResponse.SC_BAD_REQUEST,msg);
}
}

所以需要我们在自定义的Servlet中override这些方法!

Servlet响应请求阶段:

对于用户到达Servlet的请求,Servlet容器会创建特定于这个请求的ServletRequest对象和ServletResponse对象,然后调用Servlet的service方法。service方法从ServletRequest对象获得客户请求信息,处理该请求,并通过ServletResponse对象向客户返回响应信息。

对于Tomcat来说,它会将传递过来的参数放在一个Hashtable中,该Hashtable的定义是:

1
private Hashtable<String String[]> paramHashStringArray = new Hashtable<String String[]>();

这是一个String–>String[]的键值映射。
HashMap线程不安全的,Hashtable线程安全。

Servlet终止阶段:

当WEB应用被终止,或Servlet容器终止运行,或Servlet容器重新装载Servlet新实例时,Servlet容器会先调用Servlet的destroy()方法,在destroy()方法中可以释放掉Servlet所占用的资源。

Servlet何时被创建:

  • 默认情况下,当WEB客户第一次请求访问某个Servlet的时候,WEB容器将创建这个Servlet的实例。

  • 当web.xml文件中如果元素中指定了子元素时,Servlet容器在启动web服务器时,将按照顺序创建并初始化Servlet对象。

注意:在web.xml文件中,某些Servlet只有元素,没有元素,这样我们无法通过url的方式访问这些Servlet,这种Servlet通常会在元素中配置一个子元素,让容器在启动的时候自动加载这些Servlet并调用init()方法,完成一些全局性的初始化工作。

Spring MVC 请求方法处理

发表于 2016-08-15

在前面的文章中有说明:<mvc:annotation-driven />在spring 3.1之后会注册了RequestMappingHandlerMapping和RequestMappingHandlerAdapter,本文详细介绍具体的实现。

在xml文件中配置mvc:annotation-driven,有一个专门的类BeanDefinitionParser来解析处理这个东西。 它只有一个方法:

1
2
3
4
5
6
7
8
9
10
11
12
13
14
15
16
17
18
public interface BeanDefinitionParser {
/**
* Parse the specified {@link Element} and register the resulting
* {@link BeanDefinition BeanDefinition(s)} with the
* {@link org.springframework.beans.factory.xml.ParserContext#getRegistry() BeanDefinitionRegistry}
* embedded in the supplied {@link ParserContext}.
* <p>Implementations must return the primary {@link BeanDefinition} that results
* from the parse if they will ever be used in a nested fashion (for example as
* an inner tag in a {@code <property/>} tag). Implementations may return
* {@code null} if they will <strong>not</strong> be used in a nested fashion.
* @param element the element that is to be parsed into one or more {@link BeanDefinition BeanDefinitions}
* @param parserContext the object encapsulating the current state of the parsing process;
* provides access to a {@link org.springframework.beans.factory.support.BeanDefinitionRegistry}
* @return the primary {@link BeanDefinition}
*/
BeanDefinition parse(Element element, ParserContext parserContext);
}
阅读全文 »
1…272829…31
David

David

Develop Notes

155 日志
37 标签
GitHub Weibo
© 2016 - 2020 David
由 Hexo 强力驱动
主题 - NexT.Pisces